Using a Github Page with your own Domain to publish you Obsidian vault through Quartz for free
This is a detailed step-by-step tutorial that will allow you to set up Quartz to publish a folder of your vault as a website for free in Github Pages, is mostly a reminder for myself, I hope that it may be useful for you.
Requirements
- Familiarity with the CLI in MacOS
- MacOS whatever version, mine is Sequoia 15.6.1
- A working installation on Obsidian, mine is 1.9.14
Obsidian Setup
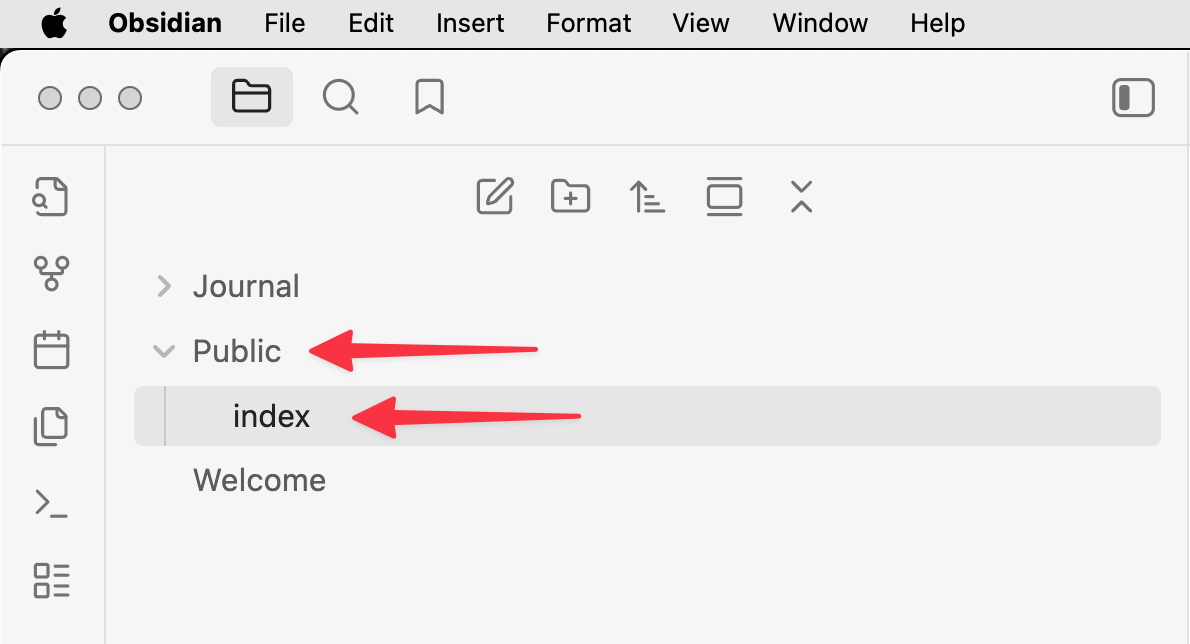
Add a Public folder in the root of your vault, this folder will be the source for Quartz’ default content/ folder later and its content will be the target to be published, also add an index file to this folder, Obsidian will add the .md extension, Quartz requires it.
And copy the path, full path, to the Public folder as it will be required later when setting up Quartz:
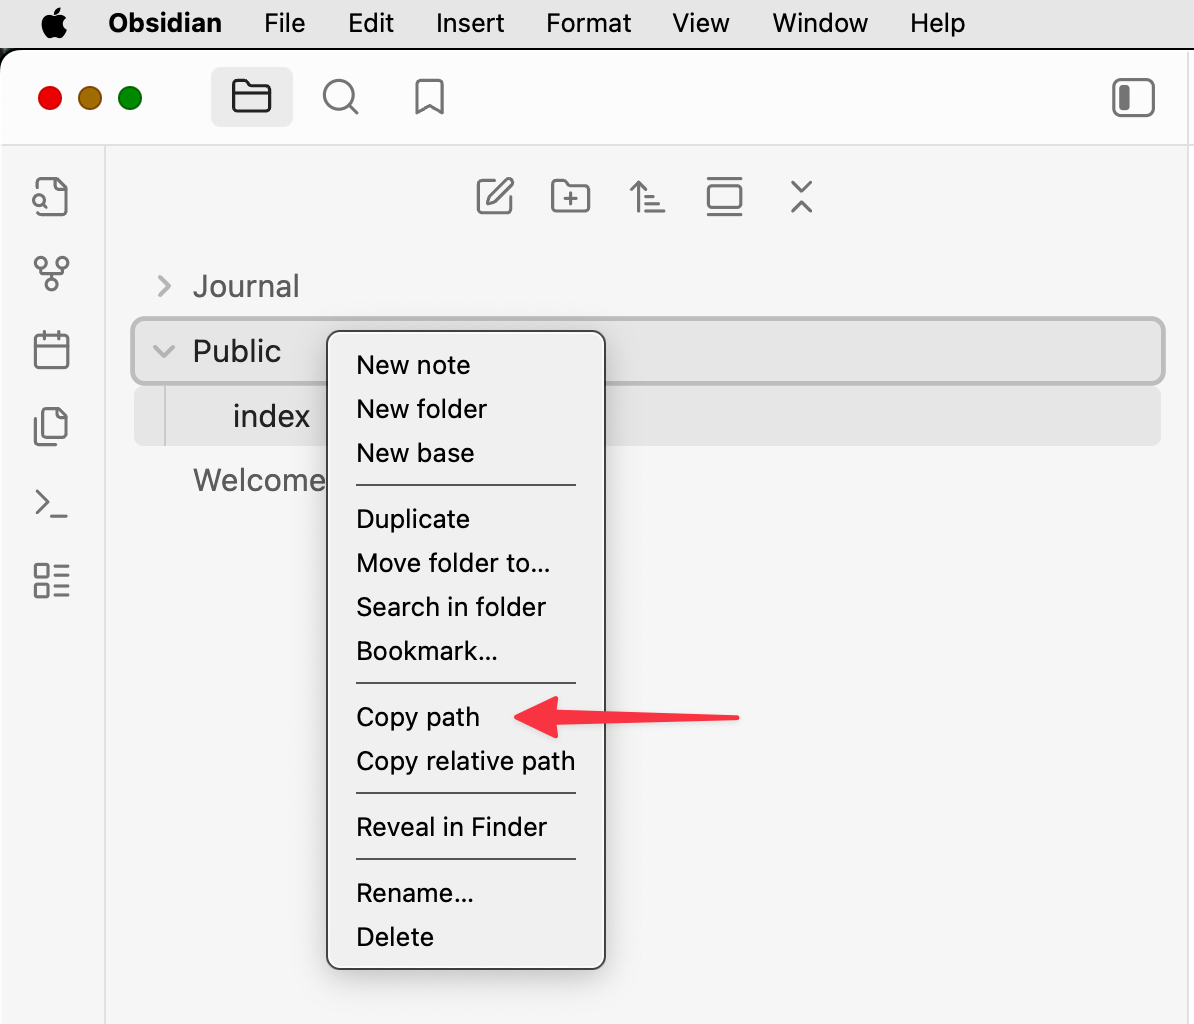
In my case this is /Users/whatever/Obsidian/Aníbal Rojas/Public
Github Repository Setup
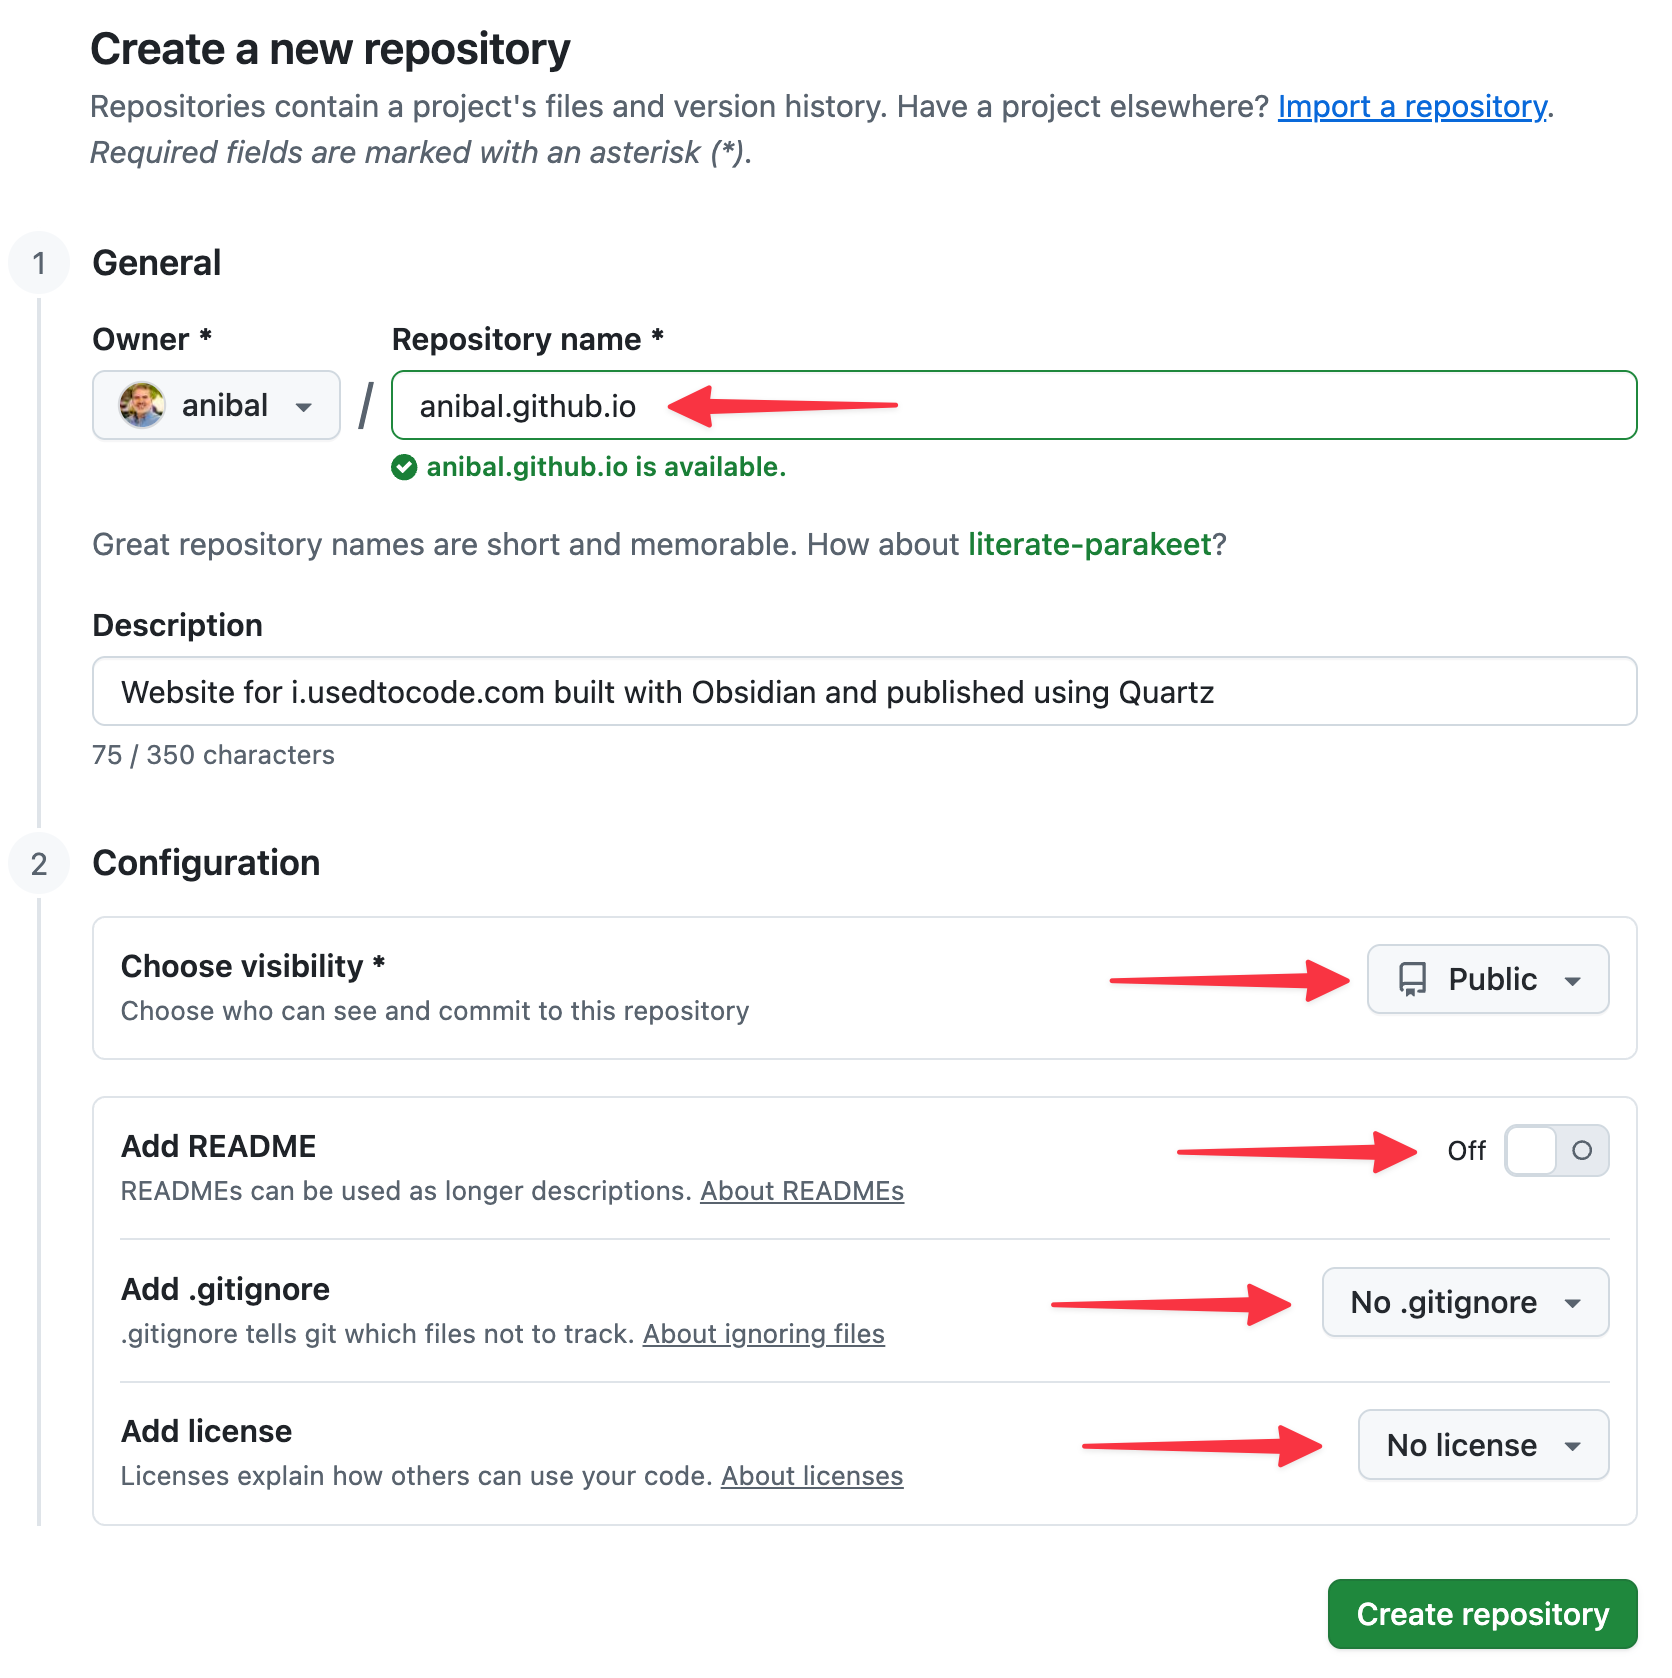
Create a new repository that will host the content of your website, in this case we will follow Github convention <username>.github.io in this case it will anibal.github.io it has to be public, without a default README, .gitignore and license file:
 If you navigate to your default website in Github (
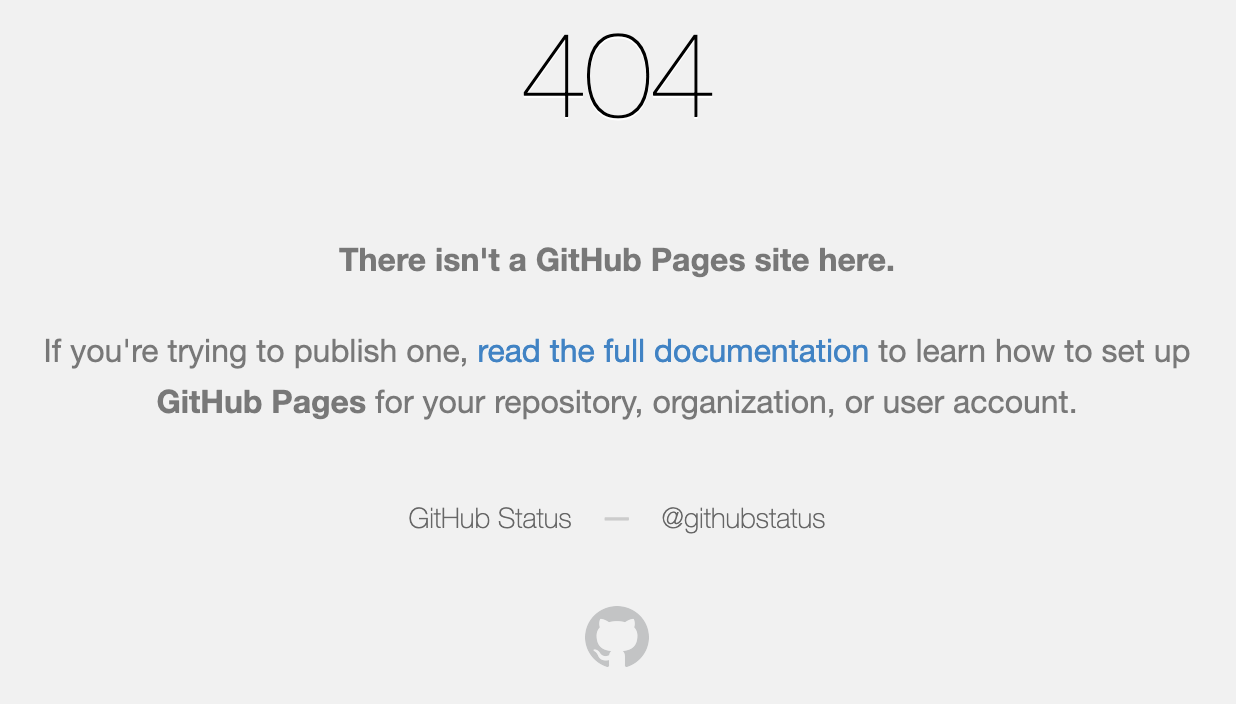
https://<username>.github.io/) you will get a 404 error, which is normal at this point as the website is resolving in an empty repository that doesn’t have a index file.
We will need the URL for this repository to configure it in Quartz, in my case I already have SSH configured, but you can use HTTPS:
 In my case it is
 git@github.com:anibal/anibal.github.io.git.
Quartz Setup
Now we need to set up Quartz, let’s start by cloning it:
❯ git clone https://github.com/jackyzha0/quartz.git
Cloning into 'quartz'...
remote: Enumerating objects: 12059, done.
remote: Counting objects: 100% (9/9), done.
remote: Compressing objects: 100% (9/9), done.
remote: Total 12059 (delta 1), reused 0 (delta 0), pack-reused 12050 (from 2)
Receiving objects: 100% (12059/12059), 37.14 MiB | 25.54 MiB/s, done.
Resolving deltas: 100% (7590/7590), done.
Move into the cloned folder:
cd quartzRun npm i to install the required dependencies:
❯ npm i

up to date, audited 578 packages in 813ms

201 packages are looking for funding
  run `npm fund` for details

found 0 vulnerabilities
Run the npx quartz create command and select the option “Empty Quartz”, this will create an empty content folder that will later populate:
❯ npx quartz create

┌   Quartz v4.5.2
│
◆  Choose how to initialize the content in `/Users/whatever/quartz/content`
│  ● Empty Quartz
│  ○ Copy an existing folder
│  ○ Symlink an existing folder (don't select this unless you know what you are doing!)
└
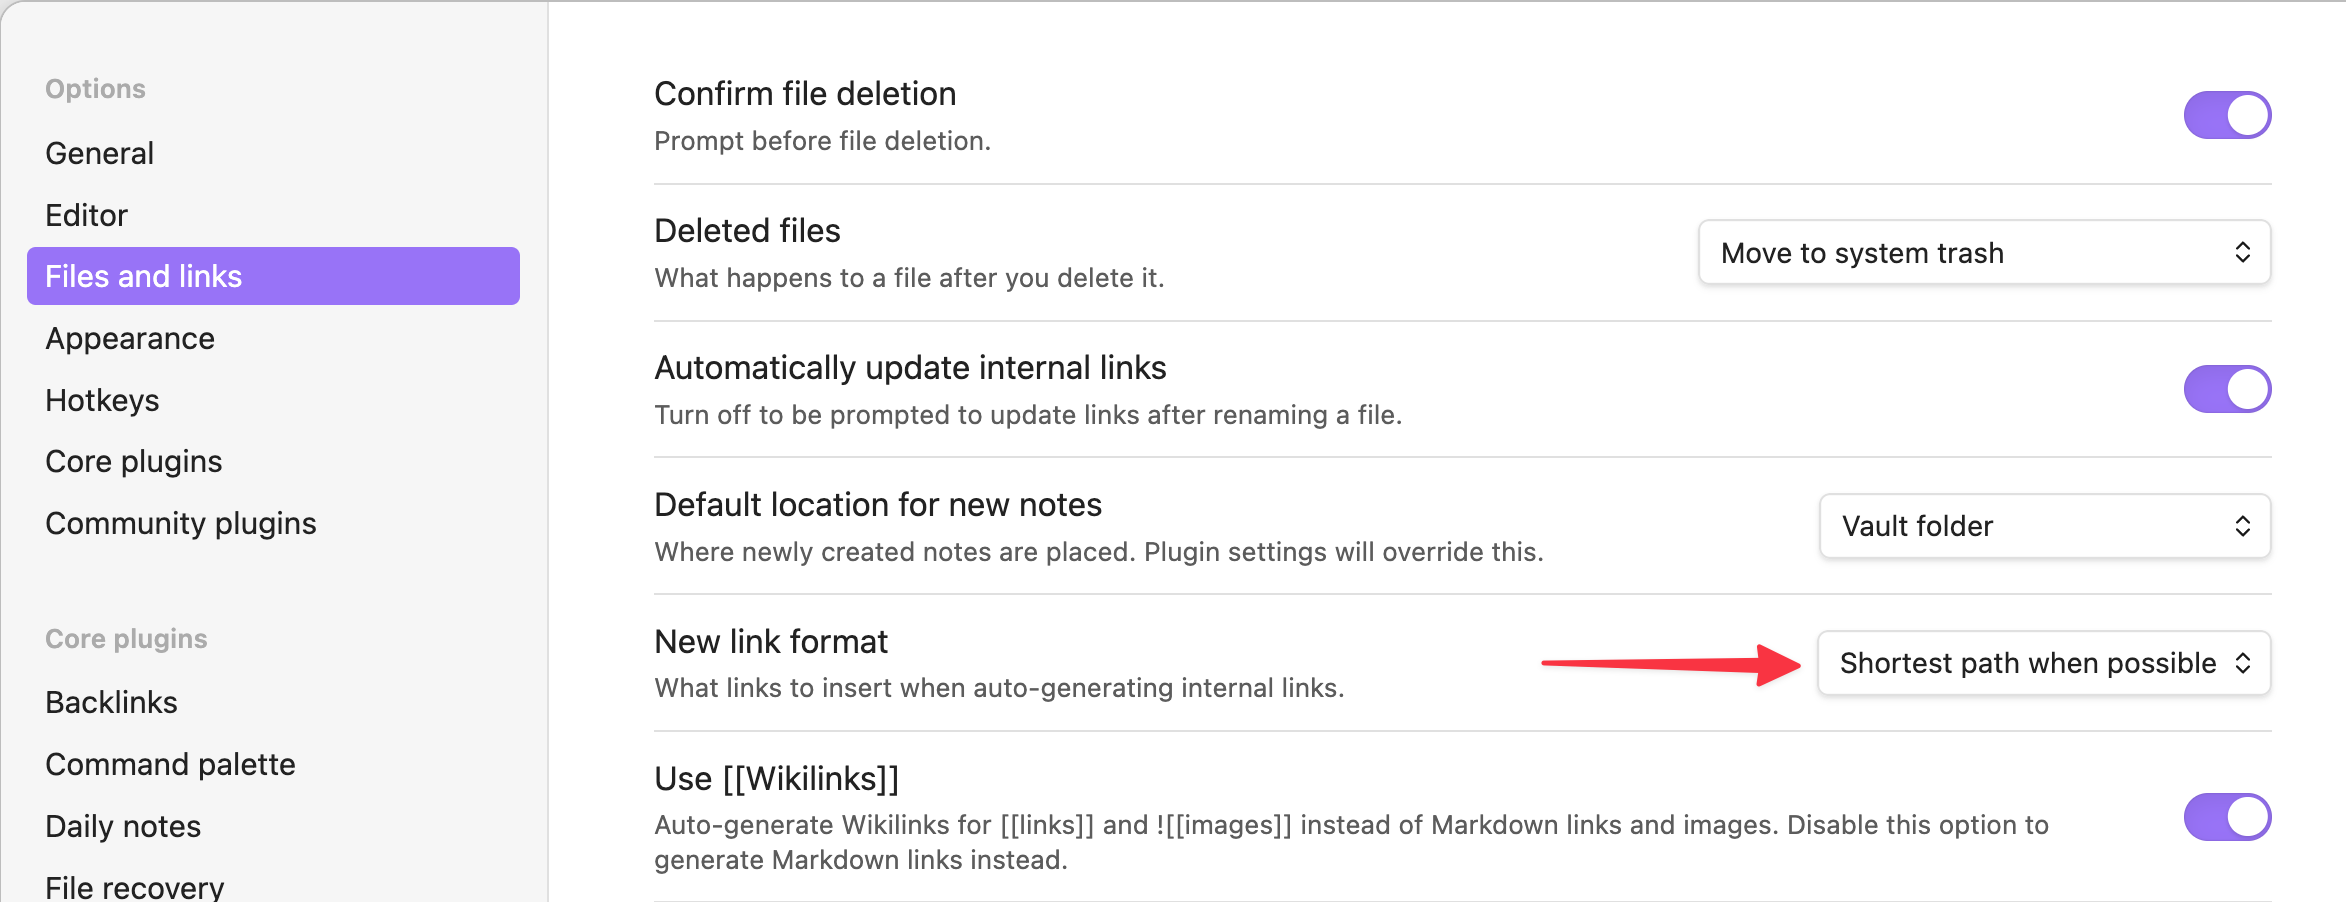
When prompted to “Choose how Quartz should resolve links in your content” you should choose the option matching your Obsidian settings (“Files and links”), in my case “Treat links as shortest path” as you can see in the screenshot:
And here the matching selection in Quartz create:
❯ npx quartz create

┌   Quartz v4.5.2
│
◇  Empty Quartz
│
◆  Choose how Quartz should resolve links in your content. This should match Obsidian's link format. You can change this later in `quartz.config.ts`.
│  ● Treat links as shortest path ((default))
│  ○ Treat links as absolute path
│  ○ Treat links as relative paths
└
And you should see a "You're all set!" message:
❯ npx quartz create

┌   Quartz v4.5.2
│
◇  Empty Quartz
│
◇  Choose how Quartz should resolve links in your content. This should match Obsidian's link format. You can change this later in `quartz.config.ts`.
│  Treat links as shortest path
│
└  You're all set! Not sure what to do next? Try:
  • Customizing Quartz a bit more by editing `quartz.config.ts`
  • Running `npx quartz build --serve` to preview your Quartz locally
  • Hosting your Quartz online (see: https://quartz.jzhao.xyz/hosting)
And now you should have the empty content folder in which we will automatically copy/update the files from the Public/ Obsidian folder using the rsync command:
❯ rsync -av \ # Archive mode, preserves timestamps, permissions, etc
      --delete \ # removes files in that no longer exist in the source
      /Users/whatever/Obsidian/Public/ # Folder to copy from
      /Users/whatever/quartz/content/ # Folder to copy to
rsync is fast and simple to use, feel free to sync the source content from your choosen Obsidian to the content/ folder as you wish. You can also combine it with watch to automate this process on each file modification in the source.
If you start a local server using npx quartz build --serve you should see something like:
❯ npx quartz build --serve

 Quartz v4.5.2

Cleaned output directory `public` in 1ms
Found 2 input files from `content` in 11ms

Warning: couldn't find git repository for content
Parsed 2 Markdown files in 136ms
Filtered out 0 files in 31μs
Emitted 23 files to `public` in 797ms
Done processing 2 files in 946ms
Started a Quartz server listening at http://localhost:8080
hint: exit with ctrl+c
[200] /
[200] /index.css
[200] /prescript.js
[200] /postscript.js
[200] /static/contentIndex.json
The warning "Warning: couldn't find git repository for content" will be fixed in the next steps, and if you navigate to http://localhost:8080 in your browser you should see something like:
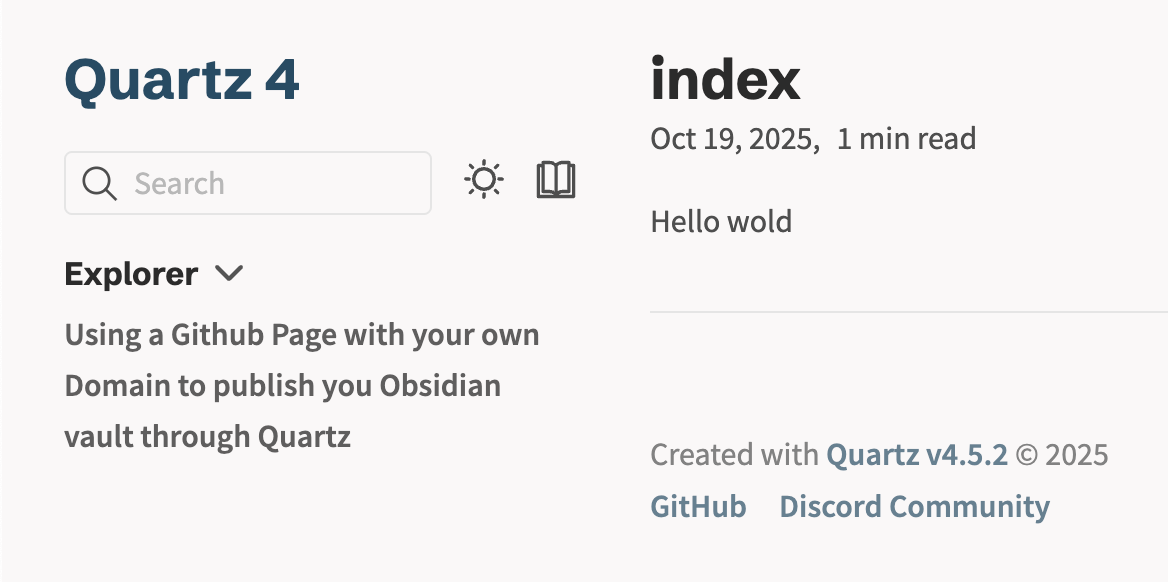
Depending on the content of the index file you created inside the Public folder in your Obsidian vault. Shut down the server with Control + C, it is not required to be running, but it is useful to check the build changes locally before syncing to Github for publishing.
Setup you Repository in your Quartz clone
Executing git remote -v in the Quartz clone only shows the quartz Remotes:
❯ git remote -v
origin  https://github.com/jackyzha0/quartz.git (fetch)
origin  https://github.com/jackyzha0/quartz.git (push)
upstream        https://github.com/jackyzha0/quartz.git (fetch)
upstream        https://github.com/jackyzha0/quartz.git (push)
Now we will set the repository we created before as the origin executing git remote set-url origin <your-remote-url-you-copied-before>, in my case git@github.com:anibal/anibal.github.io.git:
❯ git remote set-url origin git@github.com:anibal/anibal.github.io.gitThis should not print anything in response, and now we check again:
❯ git remote -v
origin  git@github.com:anibal/anibal.github.io.git (fetch)
origin  git@github.com:anibal/anibal.github.io.git (push)
upstream        https://github.com/jackyzha0/quartz.git (fetch)
upstream        https://github.com/jackyzha0/quartz.git (push)
Now we can sync the content to our repo in Github, and the upstream will allow us to update our Quartz installation. For this first time we will use the command npx quartz sync --no-pull to push the content to our empty repository and you should see something like:
❯ npx quartz sync --no-pull

 Quartz v4.5.2

Backing up your content
Detected symlink, trying to dereference before committing
[v4 6fc539a] Quartz sync: Oct 19, 2025, 6:14 PM
 12 files changed, 210 insertions(+), 9 deletions(-)
 delete mode 100644 content/.gitkeep
 create mode 100644 content/Using a Github Page with your own Domain to publish you Obsidian vault through Quartz.md
 create mode 100644 content/index.md
Pushing your changes
Enumerating objects: 11742, done.
Counting objects: 100% (11742/11742), done.
Delta compression using up to 8 threads
Compressing objects: 100% (4271/4271), done.
Writing objects: 100% (11742/11742), 37.40 MiB | 10.71 MiB/s, done.
Total 11742 (delta 7384), reused 11702 (delta 7357), pack-reused 0 (from 0)
remote: Resolving deltas: 100% (7384/7384), done.
To github.com:anibal/anibal.github.io.git
 * [new branch]      v4 -> v4
branch 'v4' set up to track 'origin/v4'.
Done!IMPORTANT: For posterior syncs we can just use npx quartz sync without the --no-pull option.
Configure the Page in the Github Repository
In the “Settings” of the repository select as deployment Source, “Github Actions”:
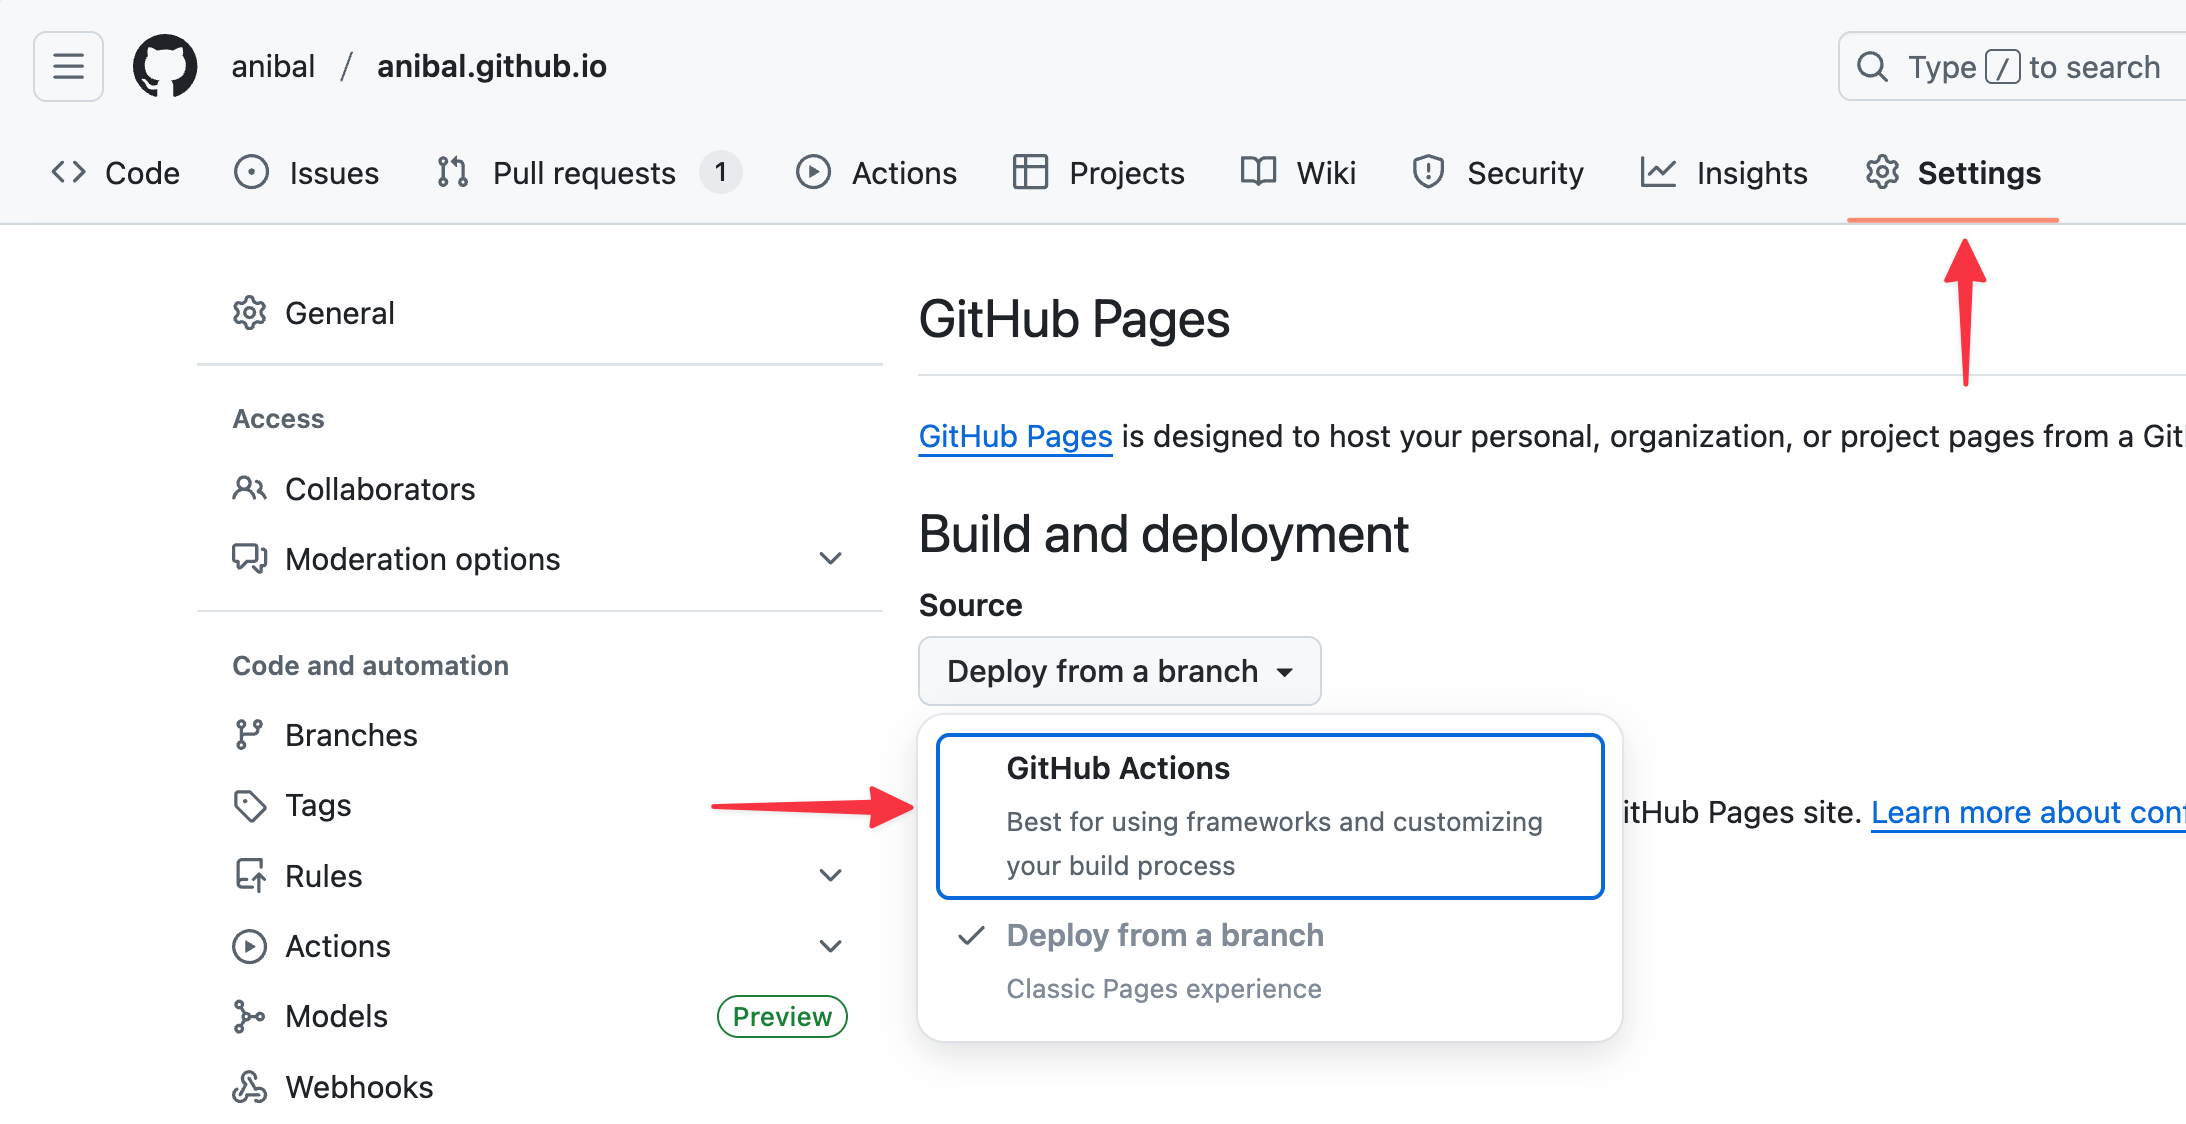
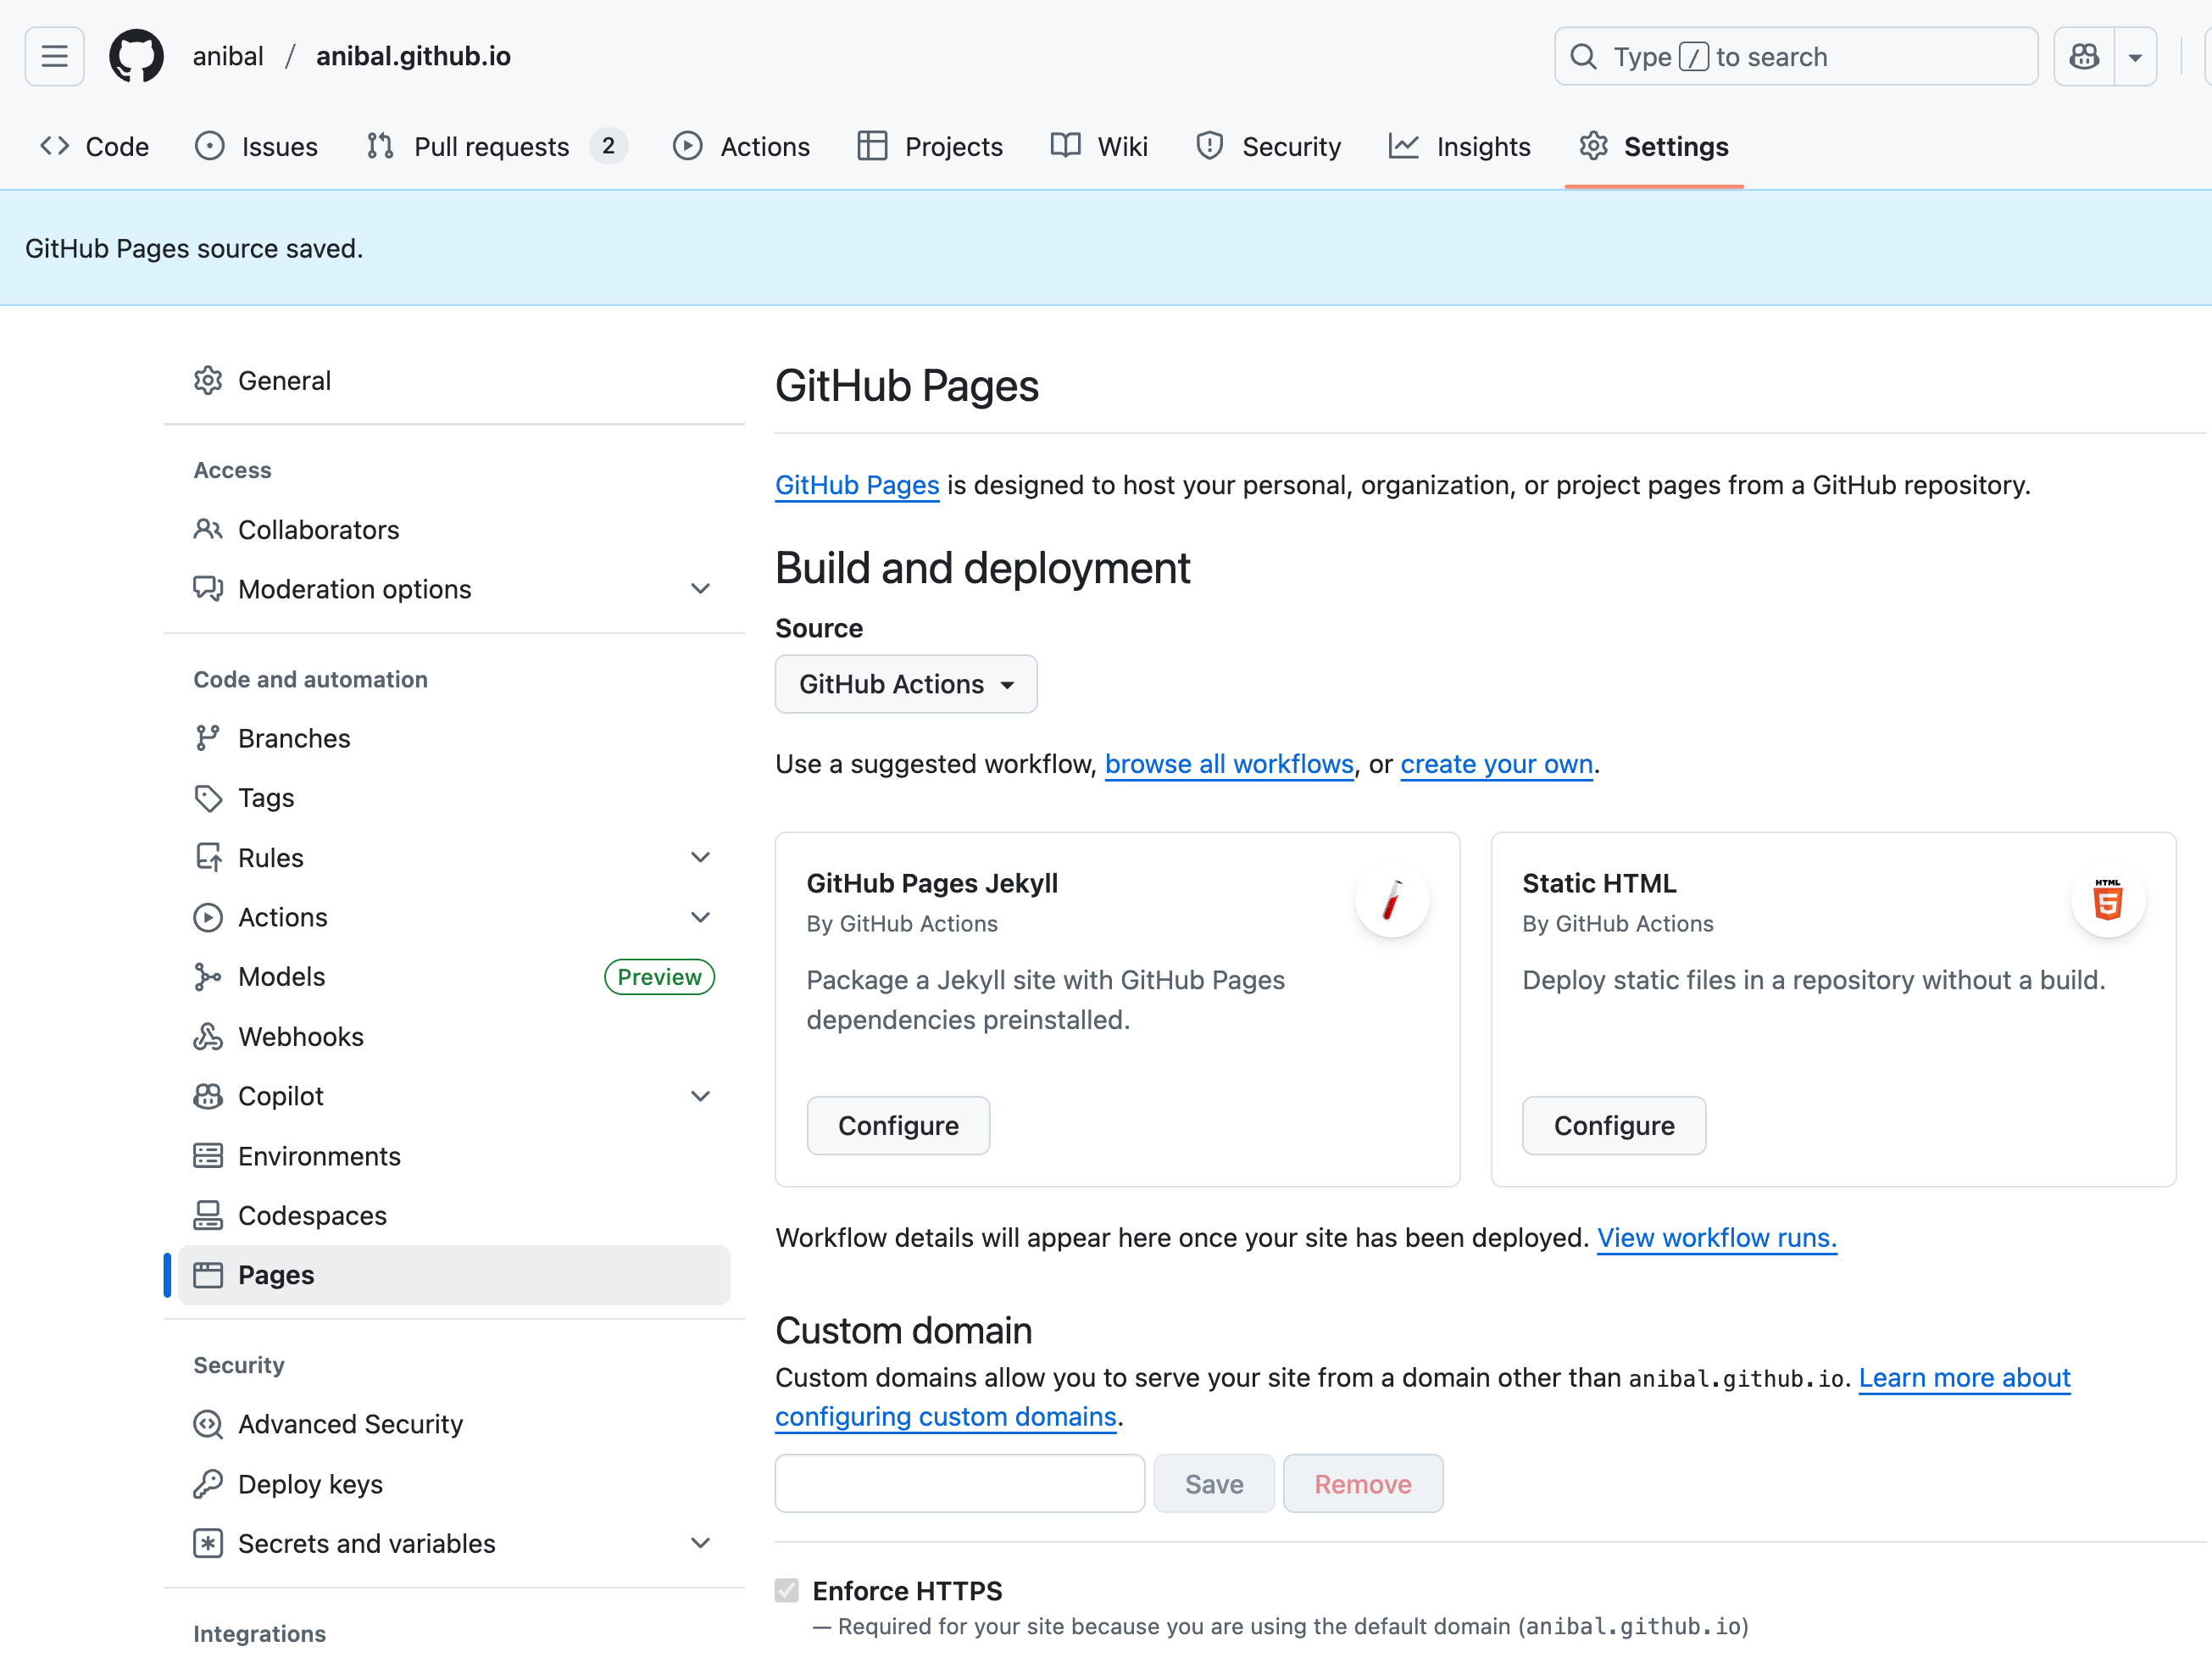
After this change, you should see the something like:
Update the Deployment Strategy
Run the following command in the root of your of your Quartz clone, as you have been doing touch .github/workflows/deploy.yml, this will create a file deploy.yml as you can check:
❯ ls -la  .github/workflows/deploy.yml
-rw-r--r--@ 1 anibal  staff  0 Oct 19 18:24 .github/workflows/deploy.yml
Copy and paste this configuration into the newly created deploy.yml file:
name: Deploy Quartz site to GitHub Pages

on:
  push:
    branches:
      - v4

permissions:
  contents: read
  pages: write
  id-token: write

concurrency:
  group: "pages"
  cancel-in-progress: false

jobs:
  build:
    runs-on: ubuntu-22.04
    steps:
      - uses: actions/checkout@v4
        with:
          fetch-depth: 0 # Fetch all history for git info
      - uses: actions/setup-node@v4
        with:
          node-version: 22
      - name: Install Dependencies
        run: npm ci
      - name: Build Quartz
        run: npx quartz build
      - name: Upload artifact
        uses: actions/upload-pages-artifact@v3
        with:
          path: public

  deploy:
    needs: build
    environment:
      name: github-pages
      url: ${{ steps.deployment.outputs.page_url }}
    runs-on: ubuntu-latest
    steps:
      - name: Deploy to GitHub Pages
        id: deployment
        uses: actions/deploy-pages@v4
I just copied the file from the Quartz docs, feel free to check for an updated version there, you can check it with:
❯ head  .github/workflows/deploy.yml
name: Deploy Quartz site to GitHub Pages

on:
  push:
    branches:
      - v4

permissions:
  contents: read
  pages: write
Now we need to commit these changes executing npx quartz sync that should trigger the deployment of the site, you should see something like:
❯ npx quartz sync

 Quartz v4.5.2

Backing up your content
Detected symlink, trying to dereference before committing
[v4 93048d3] Quartz sync: Oct 19, 2025, 6:32 PM
 4 files changed, 159 insertions(+), 1 deletion(-)
 create mode 100644 .github/workflows/deploy.yml
Pulling updates from your repository. You may need to resolve some `git` conflicts if you've made changes to components or plugins.
From github.com:anibal/anibal.github.io
 * branch            v4         -> FETCH_HEAD
Already up to date.
Pushing your changes
Enumerating objects: 16, done.
Counting objects: 100% (16/16), done.
Delta compression using up to 8 threads
Compressing objects: 100% (10/10), done.
Writing objects: 100% (10/10), 617.27 KiB | 8.23 MiB/s, done.
Total 10 (delta 5), reused 0 (delta 0), pack-reused 0 (from 0)
remote: Resolving deltas: 100% (5/5), completed with 5 local objects.
To github.com:anibal/anibal.github.io.git
   6fc539a..93048d3  v4 -> v4
branch 'v4' set up to track 'origin/v4'.
Done!
In the browser head back to https://<username>.github.io/ you should see something similar to what you saw at localhost depending on the state of your Public folder in Obsidian.
Verify your Domain in Github
Follow these steps in Github:
- Click in your Profile (top right)
- Click Settings from the menu that drops
- Click Pages from the sidebar menu on the left
- Copy the Name of the TXT record you will need to create in your DNS
- Copy the Value of the TXT record you will set if your DNS for the Name
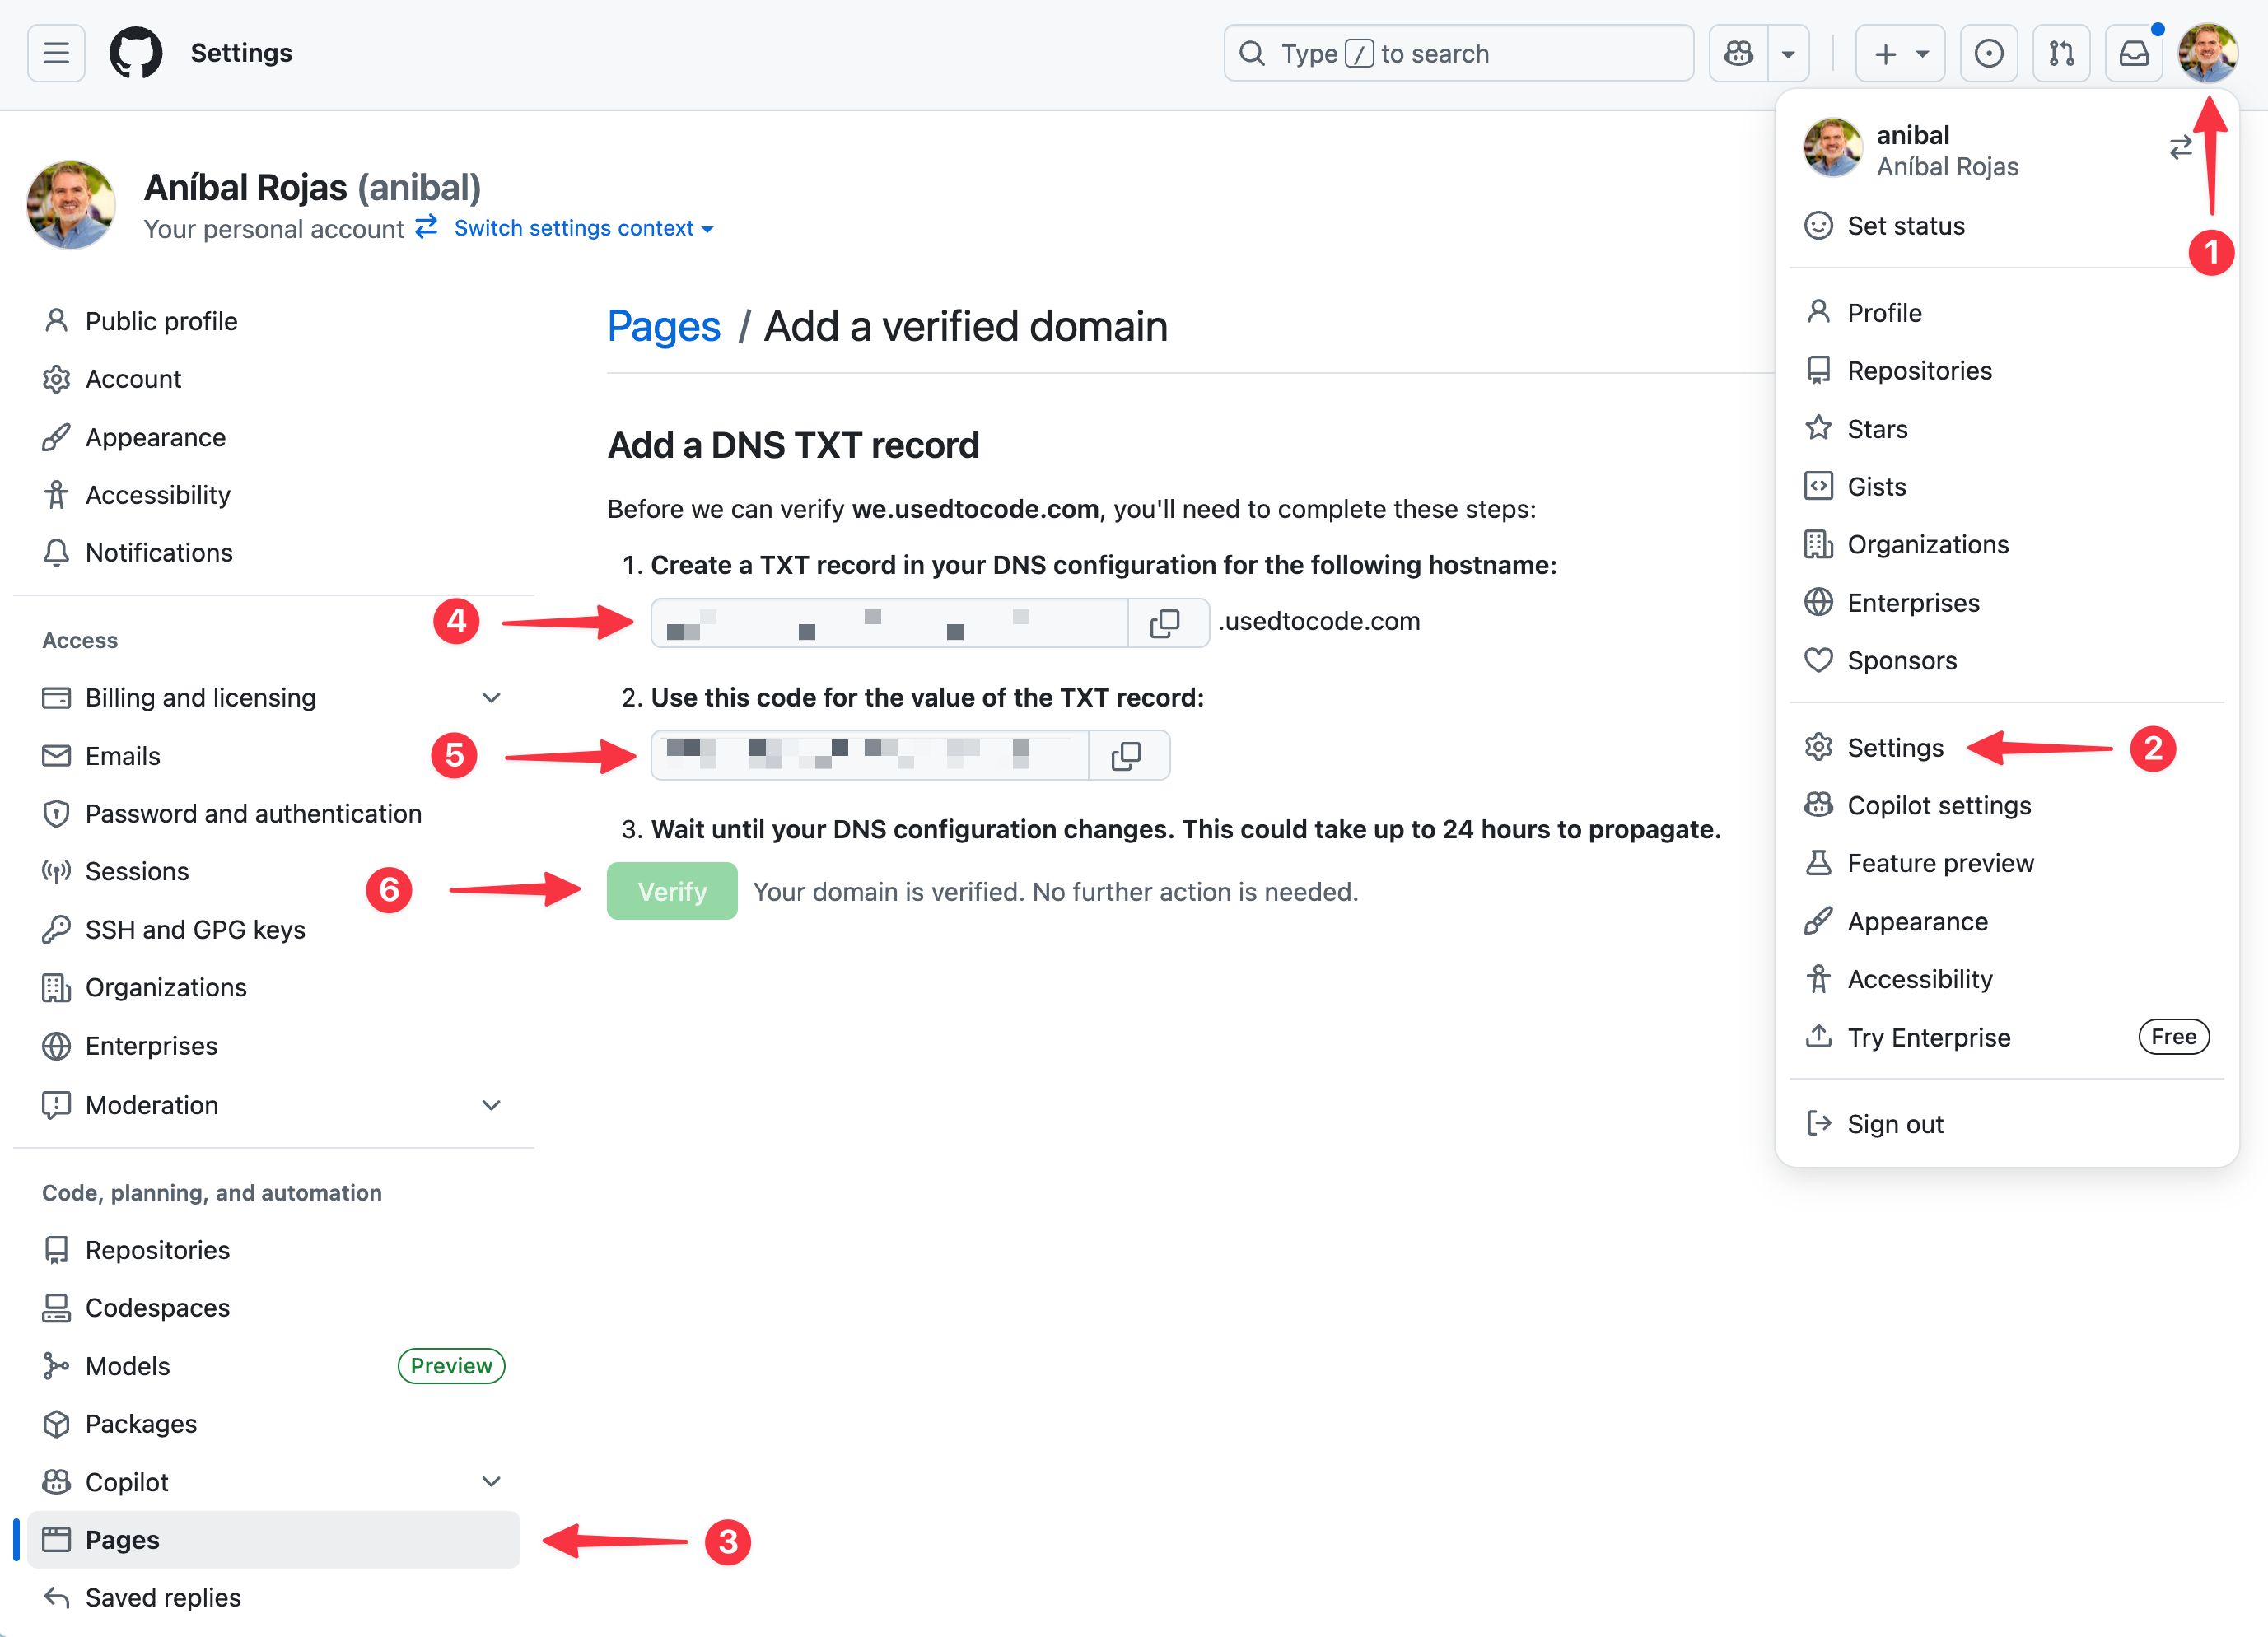
Go to you DNS management panel and add a TXT type record with the Name and Value you copied from the Github Domain Verification page, should look like this:

Go back to the verification page and click on “Verify” and wait for the verification process to complete.
Add a Subdomain in your DNS
You can use an apex domain, in this case it will be a subdomain, back in you DNS management panel add a CNAME for your <username>.github.io similar to what you did for the TXT record:

Add the Subdomain to you Repository
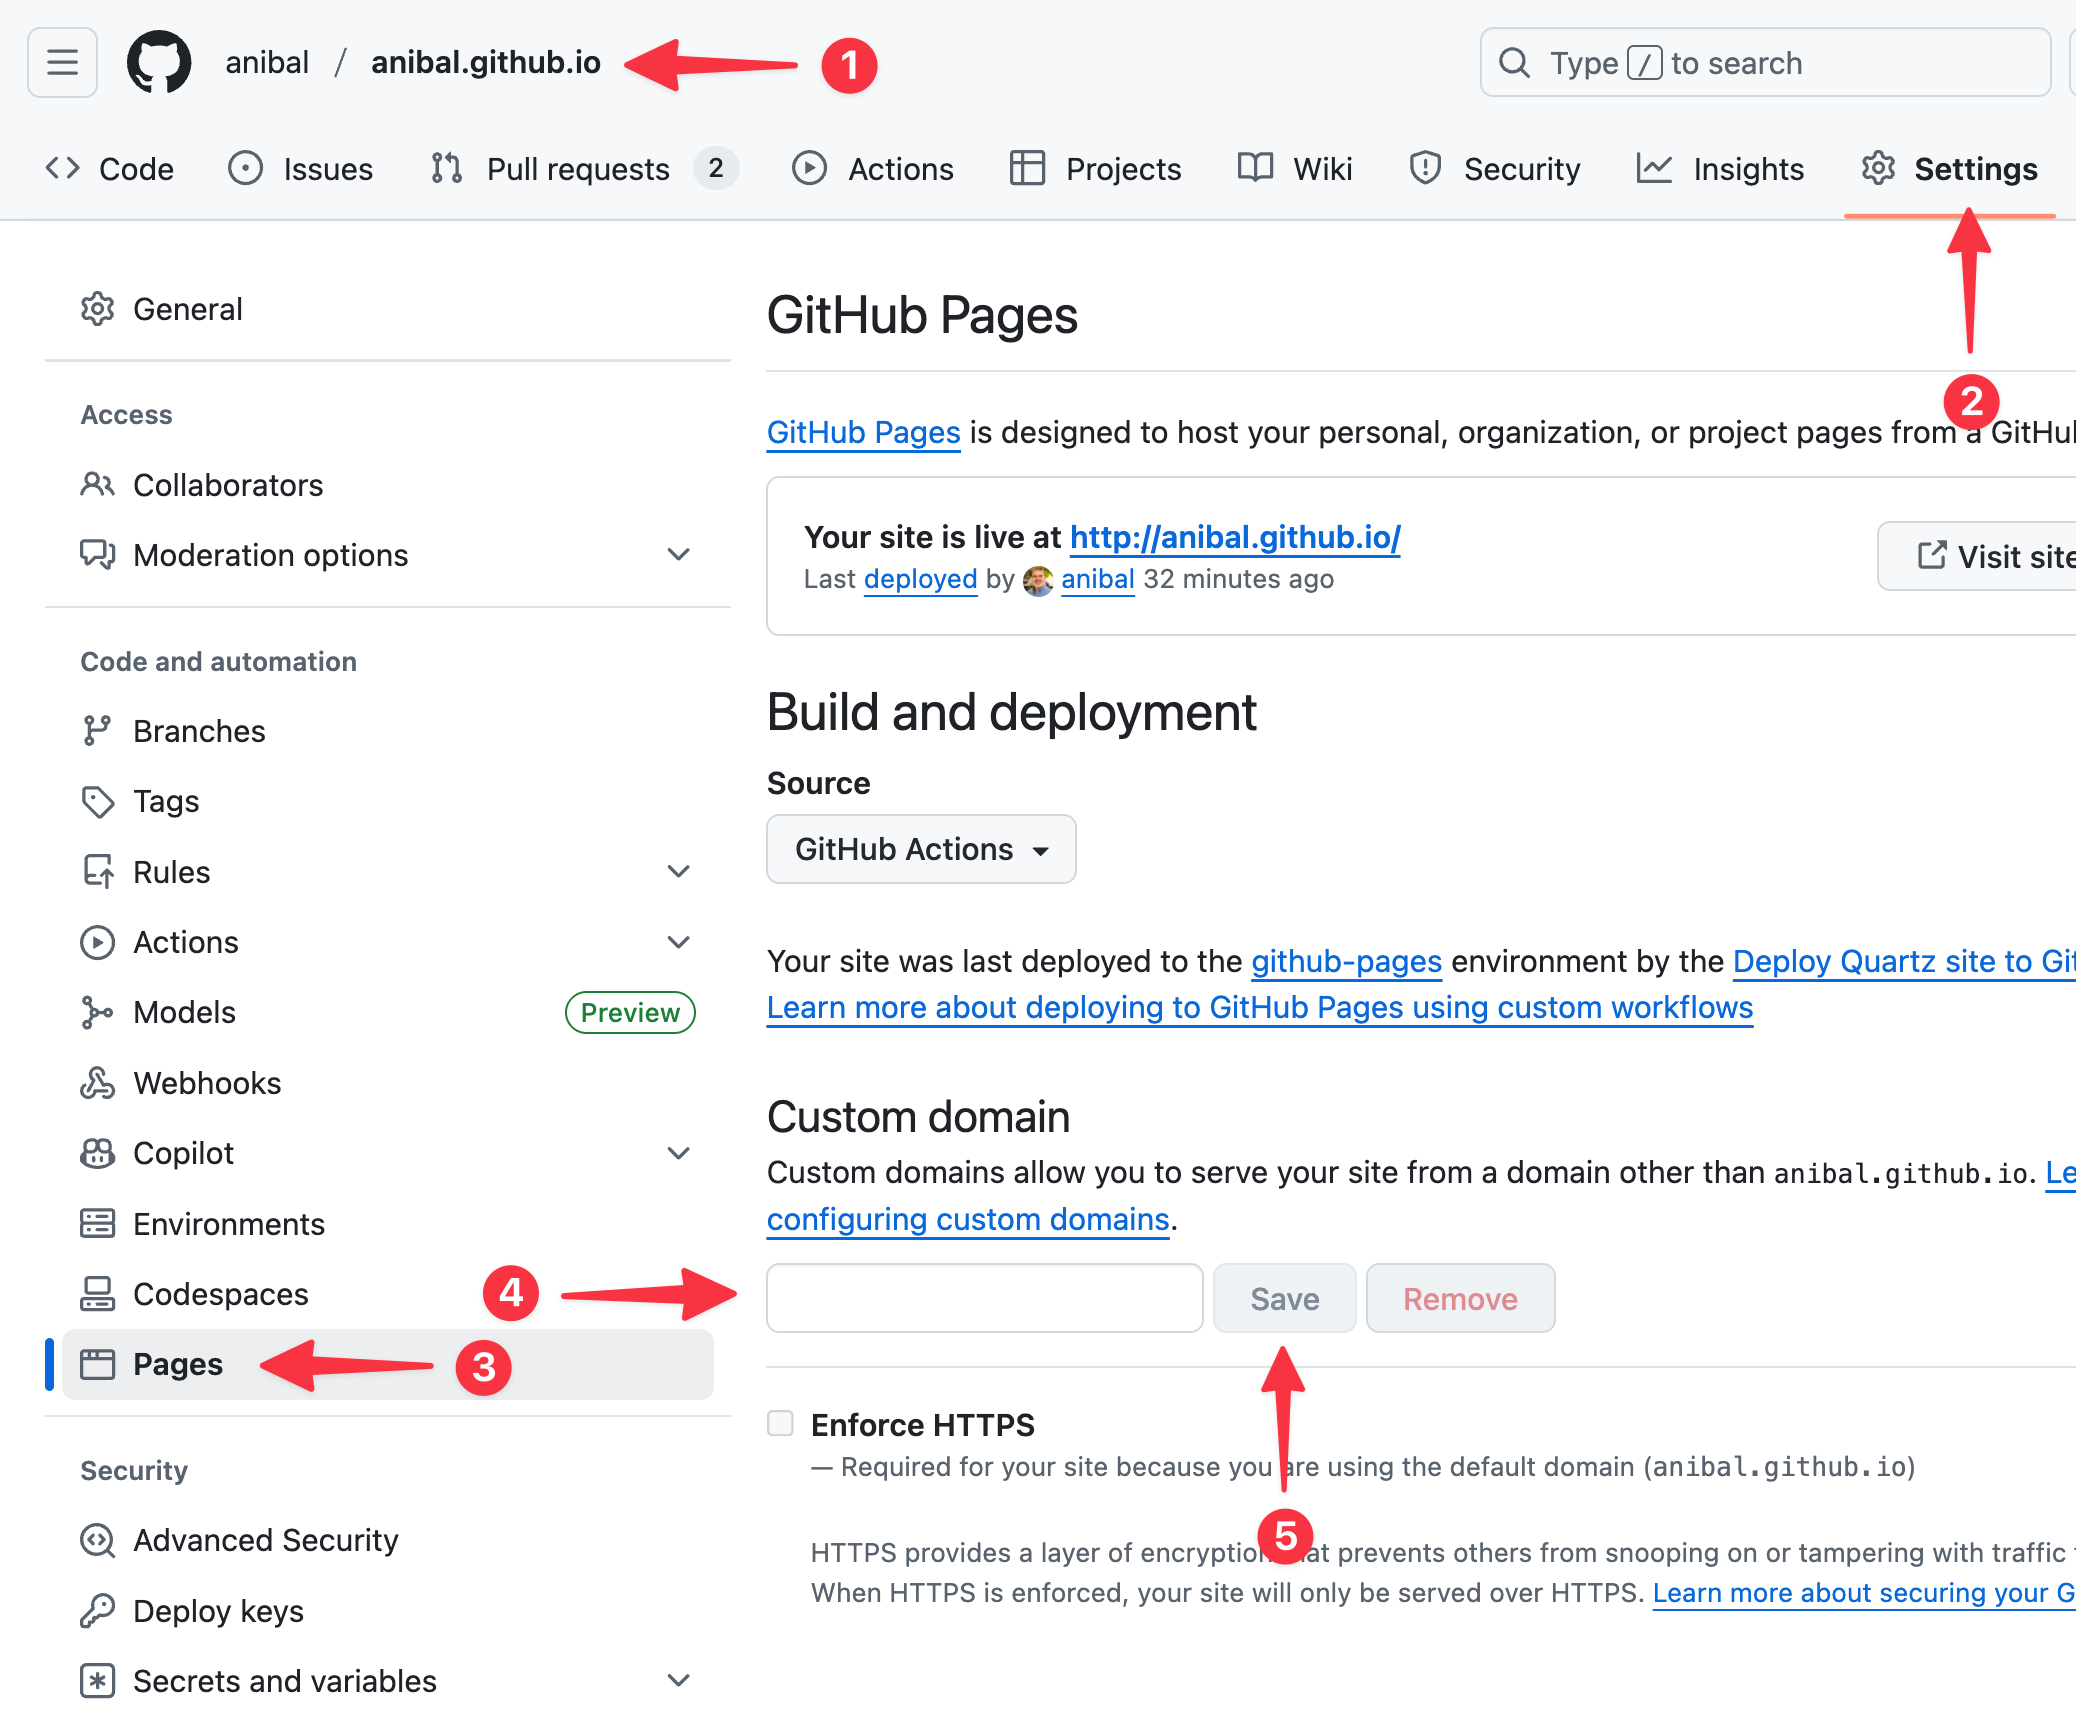
Follow these steps in Github:
- Go to your repository
- Click on Settings, the last option to the right
- Click Pages from the sidebar menu on the left
- Add the Subdomain
- Click on Save
To confirm that your DNS record was configured correctly, use the dig command with your subdomain, in my case:
❯ dig we.usedtocode.com +nostats +nocomments +nocmd

; <<>> DiG 9.10.6 <<>> we.usedtocode.com +nostats +nocomments +nocmd
;; global options: +cmd
;we.usedtocode.com.             IN      A
we.usedtocode.com.      13876   IN      CNAME   anibal.github.io.
anibal.github.io.       3076    IN      A       185.199.110.153
anibal.github.io.       3076    IN      A       185.199.109.153
anibal.github.io.       3076    IN      A       185.199.111.153
anibal.github.io.       3076    IN      A       185.199.108.153
Enforce HTTPS
If you go to http://your.subdomain.com/ whatever it is, it should render the previously published page. IMPORTANT: Note the http in the URL instead of https, this is because we haven’t added a certificate yet.
 A certificate should be automatically provisioned from Let’s Encrypt in a few minutes and then you should be able to click the Enforce HTTPS option:

Write and Sync
Congratulations the easy part was completed, now you need to actually write and publish :-) Each time you want to publish a change you will need to execute both: npx quartz sync at the root folder of your Quartz installation.
In my case I run:
rsync -av --delete "/Users/whatever/Public/" /Users/whatever/quartz/content/ && npx quartz build --serveSo I can check that everything is fine at http://localhost:8080 before pusblishing.
That’s it.